Houdah Software released a major upgrade of their excellent Spotlight search utility, HoudahSpot 5, last week. Among a ton of useful new features, HoudahSpot now also integrates with Default Folder X, giving you a much more powerful way to search for files and folders in Open and Save dialogs.
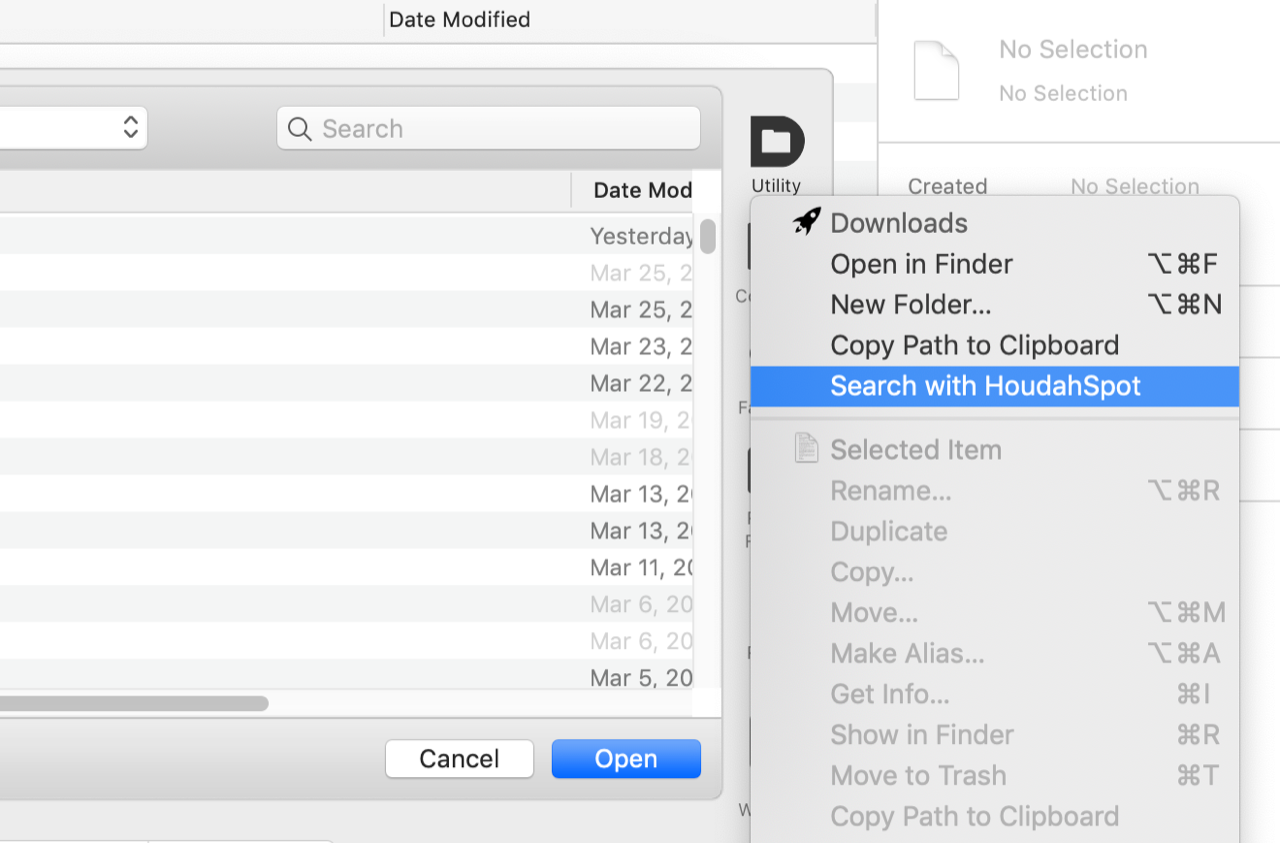
Just select “Search with HoudahSpot” from Default Folder X’s Utility menu
When you’re in a file dialog, Default Folder X provides a menu command to quickly search the currently displayed folder in HoudahSpot. This gives you the flexibility to search by file type, tags, content, modification date, or any other parameter you can think of.
And use HoudahSpot’s “Default Folder X” menu to send a search result to a waiting file dialog
Once you’ve located the file you want in HoudahSpot, Control-click on that file and use the “Default Folder X” menu to finish the round trip and send it back to the waiting file dialog (in Preview, in this case).
I’m happy to have had the chance to collaborate with Pierre Bernard, HoudahSpot’s developer, on this workflow. It delivers more convenience and time-savings to all the folks that use both HoudahSpot and Default Folder X.
If you have ideas for similar connections between your favorite indie applications, let the developers know – many of us are very receptive to your suggestions. Default Folder X also integrates with ForkLift and Path Finder, for example, because lots of people asked for it!
Jettison 1.7.1 is available, bringing fixes for a couple of simple problems and one complicated one.
Simple stuff:
The previous release of Jettison didn’t correctly show that it was licensed when you looked in the About box after importing a Mac App Store license. This was understandably very confusing to those of you that followed the instructions for upgrading in the FAQ. It now correctly shows “Licensed to: Mac App Store User” (since Apple doesn’t provide a way for us to get your name or Apple ID from your license) and removes the “License” item from its menu.
Also, there were occasions when all of the items in Jettison’s menu would become grayed out. This turned out to be caused by its error window getting stuck behind an application that was in Full Screen mode. It was patiently waiting for you to respond to an error message you couldn’t see – definitely not very helpful. That’s been fixed now.
Messy issues with Power Nap and Wake for Network Access:
When Power Nap or Wake for Network Access are turned on in your Energy Saver prefs, macOS may wake from sleep in ‘dark mode’ – which means it wakes from sleep, but never turns on the display. When this happens, it doesn’t let most applications – including Jettison – know when it wakes up or goes back to sleep. That means that Jettison can’t mount or eject your disks as it’s supposed to.
This would all be well and good if this temporary wakeful state mounted your disks, did its thing (like a Time Machine backup), ejected the disks and then went back to sleep. Unfortunately, while it seems to (mostly) work with Time Machine disks, if other drives get mounted during dark wake, you’ll often see a “Disk not ejected properly” error for them when you return. macOS can’t always manage the mounting and ejecting of disks correctly, even when it’s all by itself in a dark room.
Jettison 1.7.1 solves this problem by refusing to let macOS mount any non-Time Machine drives during a dark wake. This should take care of the disk errors (and associated possibility of data corruption) while still allowing you to use Power Nap and Wake for Network.
On the outside chance that you’re actually getting error messages for your Time Machine drive too, you can launch Terminal and run this command:
That will tell Jettison to prevent your Time Machine drive from being mounted during dark wakes – with the obvious consequence that Time Machine can’t run Power Nap backups while your machine is sleeping. It’s a compromise, but at least it’ll ensure that your backups don’t get corrupted.
There’s a helpful video tutorial over at Don McAllister’s ScreenCastsOnline website that details some of the keyboard shortcuts that you can use in Open and Save As dialogs. The shortcuts are built into macOS, so there’s no need for extra software, but Don does go on to point out that there are many more helpful features in Default Folder X if you really want to supercharge your Open and Save As dialogs 🙂
You can see the entirety of keyboard shortcut segment without subscribing to SCO, but you’ll have to sign up for the 10-day free trial or buy a subscription to ScreenCastsOnline to watch it through to the end and see his discussion of Default Folder X. And if you go for the subscription or free trial, make sure to check out his full-length Default Folder X tutorial.
I got an email from a customer yesterday telling me that Default Folder X had stopped displaying preview images of his new-format Microsoft Office documents. It still worked for the older formats like doc, xls and ppt files, but not docx, xlsx and pptx. Because Default Folder X uses QuickLook to generate the big previews it shows below file dialogs, we did a little poking around on his Mac to figure out what was going wrong with QuickLook.
It turns out that a new beta of DropBox (version 54.3.86) installs its own QuickLook generator plugin that overrides the system-supplied plugin for generating a number of file and image formats – including those MS Office files. OK, fine – just delete it, right? That worked until he restarted his Mac, then DropBox launched at login and promptly (and silently) reinstalled its QuickLook plugin again. I guess it knows what’s best for us, eh?
After a little thought, we arrived at this solution:
Delete the DropBox QuickLook generator plugin
Create an empty file at that location to prevent DropBox from reinstalling it
Fortunately, QuickLook is smart enough to realize that an empty file isn’t going to help it generate previews, and just defaults back to the other plugins it has. Problem solved!
The easiest way to do this is to open Terminal and execute these three commands:
A nice simple solution once you get it figured out. I imagine this is one of those problems that’s going to crop up for a lot of people, but isn’t quite obnoxious enough to get them to hunt down a solution. So there you go 🙂
I’m not a huge podcast junkie – my listening tends to ebb and flow as demands on my time change. However, Mac Geek Gab is one that always entertains, has great tips and information for getting the most out of your Mac, and helps with the weird little issues that inevitably crop up. Of course, it doesn’t hurt that they’re big fans of St. Clair Software’s products, too – it’s nice to hear my name in lights every once in a while 🙂
So, as I was reminded by Dave’s mention of Jettison in their 13th Anniversary episode a couple of weeks ago, I’ve been tuning in for years now and think some of St. Clair Software’s customers might really enjoy and benefit from the podcast. So there you are – go give them a listen, support their sponsors, and learn some new tips and tricks!
The folks over at AsianEfficiency have a new podcast episode where they recommend a number of great productivity apps – including Default Folder X, of course 🙂
I’ve just posted a beta version of Default Folder X 5.1.6 that supports the developer release of High Sierra, which Apple made available on Monday. A few under-the-hood changes to file dialogs had an impact on Default Folder X, and we’re still testing to make sure that there aren’t any hidden gremlins. If you run into any issues with the beta, please make sure to tweet, email, or comment here to ensure your bug gets fixed!
Also in the 5.1.6 beta is a handy little enhancement for people that use a consistent folder hierarchy to store files for their clients or projects. You can now use a relative path as a Favorite in Default Folder X. So if you’ve got lots of folders that look like this:
You can set a Favorite for “../images”, for example. Then, if you’re in a Save dialog pointing to any “html” folder, that Favorite will take you to the adjacent “images” folder. Pretty cool for all you super-organized folks 🙂
This is information I originally posted back in 2009, but here we are 6 macOS versions later and it’s still relevant – and people are still asking for it.
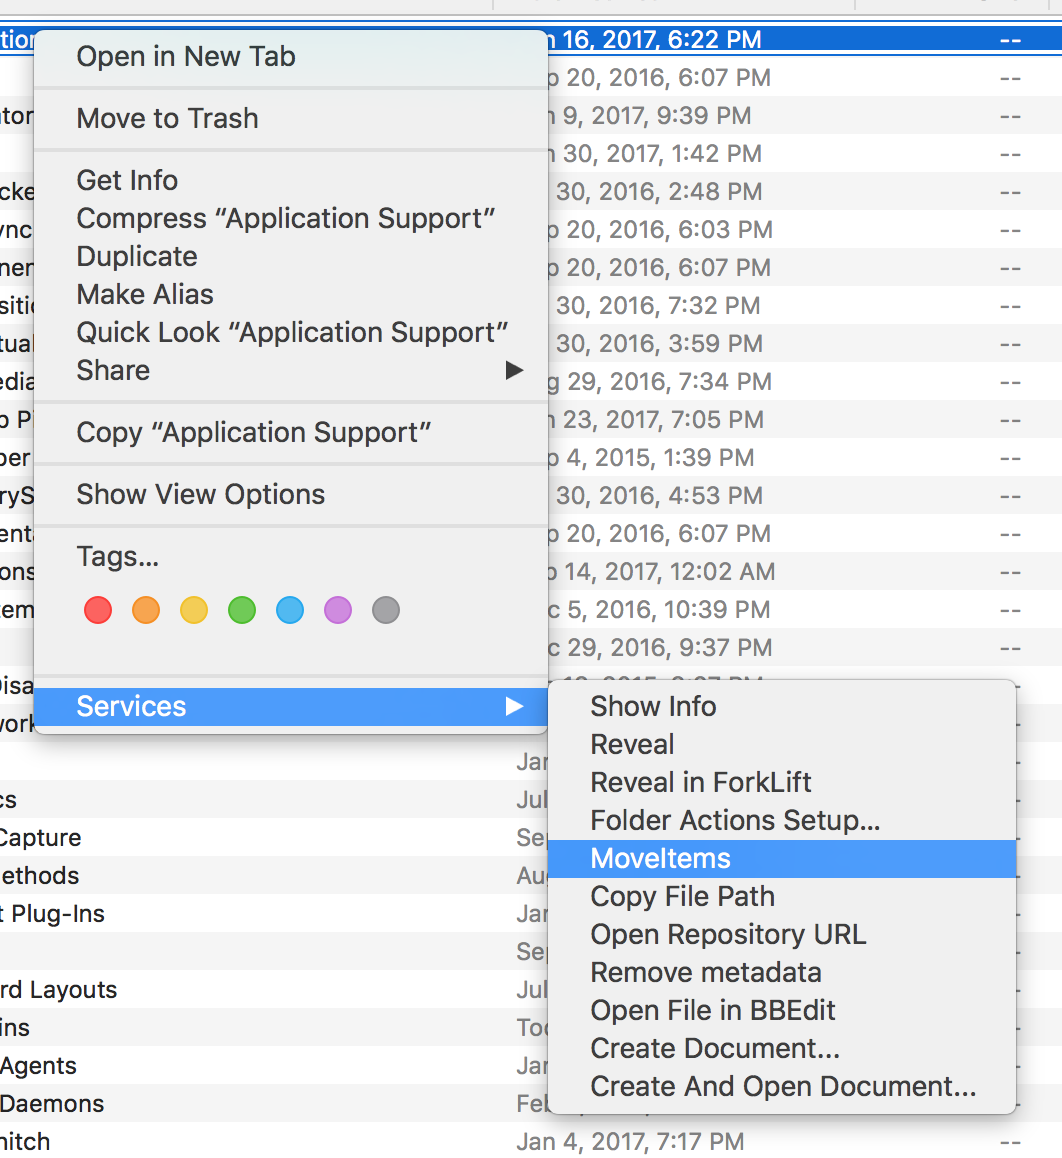
Below are details on how to create a “Move Items” contextual menu item in the Services menu in the Finder (see the picture below).
It pops up a file dialog to let you specify where you want to move the selected items, which then allows you to use Default Folder X, giving you access to all of your Favorite and Recent folders, Finder-click, etc.
TL;DR: If you just want to get things to work, there’s a link at the bottom to download an already-built Automator workflow.
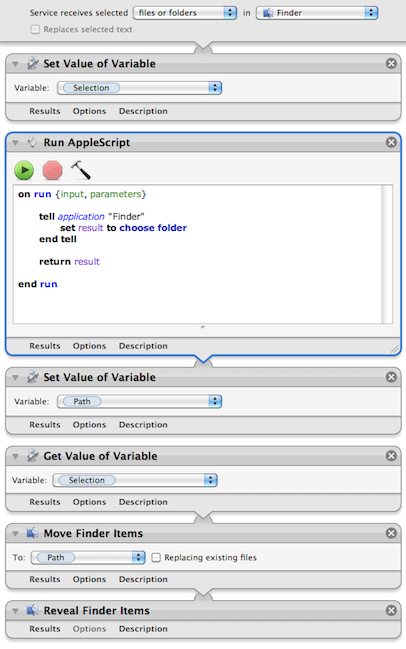
Contextual menu items are added by making a Workflow in Automator and saving it as a Service. You start by running the Automator application (it’s in your /Applications folder), creating a new Workflow, and setting it up as shown in the (old) screenshots below:
If you’re experienced with Automator, you’re probably asking: Why go to the trouble of creating variables instead of just using the “Move Finder Items” action by itself? I’m glad you asked! The reason is that I want to bring up a file dialog to specify the folder where I want the items to go. There’s not a clean way to have the “Move Finder Items” do that every time. You can change its options to “Show this action when the workflow runs” but you still have to click on it every time you use it to ask it to show a file dialog. If you use Default Folder X to enhance your Open dialogs, it’s faster to just have the dialog pop up and then go where you want to with DFX.
So in the image above, the workflow puts the current Finder selection into the “selection” variable. Then it uses AppleScript to bring up a file dialog to ask for a folder, which it stores in the “path” variable. And finally, it uses the Move Finder Items action to do the work. Not too much more complicated, and it speeds up your workflow considerably if you’ve already got DFX installed so the Open dialogs are smart.
For you Automator programmers, note that some of the actions shown in the workflow do not take inputs. I did this by control-clicking on the action (“Get Value of Variable”, for example) and choosing “Ignore Input” from the contextual menu. If you don’t do this, Automator will actually add the input from the previous step to the next one, which is definitely not what you want in this case.
Oh, and if you just want the automator workflow file so you can add it to your own system, you can download it here:
(Once you’ve gotten through the first few steps of the tutorial, you should be able to just replicate the picture above to make the Move Items service yourself).
So I’ve run into this issue both as a user and as a developer – on MacBook Pros that have both a discrete and integrated GPU, fancy animations will cause the system to switch to the more powerful discrete GPU, reducing battery life. Chris Liscio wrote a great post explaining what’s going on and what to do about it (from a developer’s perspective). The key takeaway for most developers:
This whole problem can be very easy to solve. You just have to set NSSupportsAutomaticGraphicsSwitching key to YES in your application’s Info.plist. The trouble is that an OpenGL context is being created, which defaults to switching the dGPU on. Enabling this flag in the plist will very likely fix the problem on its own, as the frameworks should Do the Right Thing (more details below) if they need access to OpenGL.
I’ve long been an avid (addicted) user of LaunchBar – if you’re a person that’s keyboard-based like I am, it’ll save you ridiculous amounts of time. Hit Command-Space to activate LaunchBar and then start typing – you can do anything you want to without taking your hands off the keyboard.
Now I’m happy to announce that Manfred Linzner, an engineer at Objective Development (the makers of LaunchBar), has put together a LaunchBar action that gives you access to Default Folder X’s favorite and recent items within LaunchBar.
If you’re a LaunchBar user, you just need to download the Default Folder X Files action from Manfred’s Github repo. After it downloads, double-click on the .lbaction file and LaunchBar will offer to install it for you. Then it’s just a matter of invoking LaunchBar and typing the first few letters of “Default Folder X Files” (or “DFX”) to get this:
Hit the right arrow key from there to select any favorite or recent folder or file from Default Folder X, or Command-right-arrow to narrow the search to just your Favorites, Recent Files, or Recent folders.
Yet another way to get to your files and folders faster – thanks Manfred!